Device integrations
Placement and cabling
Where to place the Volt DIO and how to wire a relay output and a digital input.
Put a Volt DIO in the cabinet where it has to switch a relay or read a contact. The controller reaches the module over the network, so the wiring to the relays and contacts stays short and inside the cabinet.
How many modules do you need?
- One module per cabinet where you need inputs or outputs.
- An extra module in the same cabinet when you need more than 6 inputs or 6 outputs there.
flowchart TD
  CTL["Voltmasters controller"] --> NW["installation network (Modbus TCP)"]
  NW -->|"network cable"| KA["Cabinet A: Volt DIO"]
  KA --> RA["relays and contacts"]
  NW -->|"network cable"| KB["Cabinet B: Volt DIO"]
  KB --> RB["relays and contacts"]
One module per cabinet: the number of modules follows the layout of the installation.
Wiring
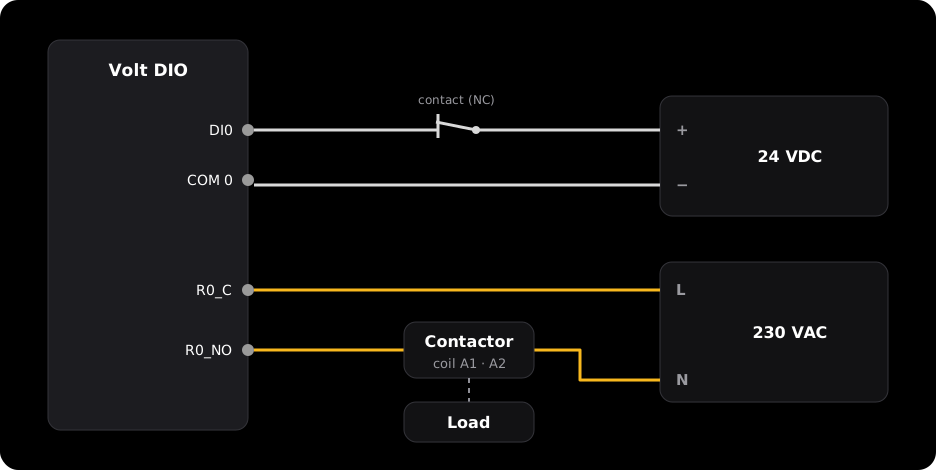
An input with a wet contact, and a relay output that switches the coil of a contactor.
- Relay output. Each output is a potential-free, normally open contact between the terminals
CandNO. Use it as a command contact, in the coil circuit of a contactor or in a stop or enable circuit. The contactor switches the load. What an output may switch directly is in the technical specifications. - Input with a wet contact. Feed 24 VDC through the contact to the input, and connect the minus to
COM 0. A closed contact reads high, an open contact low. - Input with a dry contact. Connect the contact between the input and
GND.
The terminal numbering is under Terminal block.
Network and power
- Connect every module to the installation network, the same network the controller uses.
- Give every module a fixed IP address and note the IP address, the port and the Modbus slave ID. You need them to add the module on the platform.
- Power the module from the cabinet’s 24 VDC supply.
Each module has two Ethernet ports that act as a small switch, so you can daisy-chain modules. A daisy chain is a single path though: a module that loses power also cuts off the modules behind it. Connect a module that carries an emergency stop directly to the switch.