Voltmasters Platform
Device overview
The device list on a Voltmasters EMS project: online status, search, and why only the Installer role can add, remove or configure devices.
All device management functionality on this page (adding, removing, and configuring devices) is only available to users with the Installer role. Users with the Customer role can view the device list but cannot make changes.
Select My devices to manage devices connected to the project. This page lists each device with its online status and provides options to open settings or remove the device. A search bar helps filter devices by name.
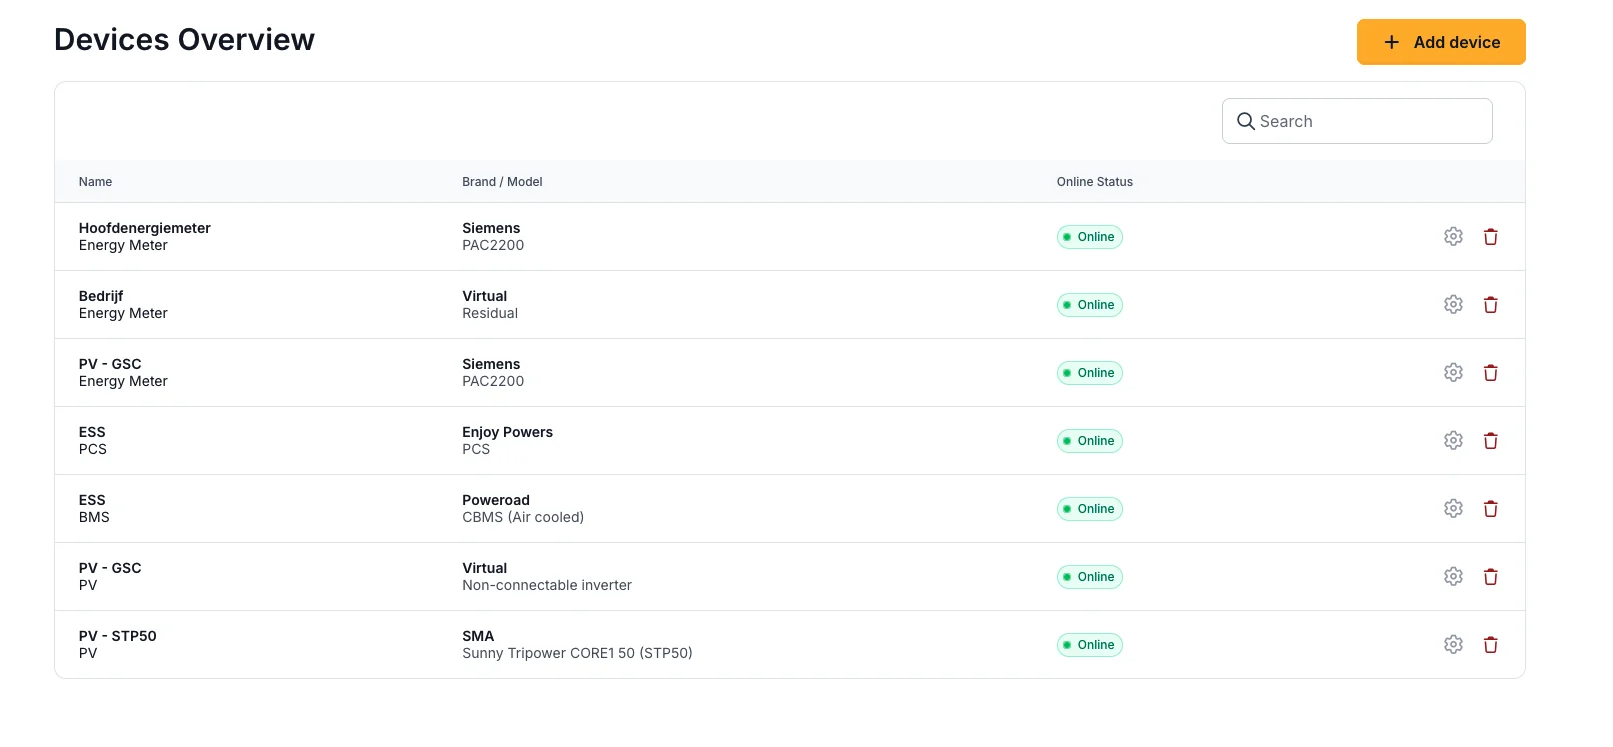
Voltmasters EMS: My devices
The device list
Next to the device list of a single project, an All devices overview lists the devices of every project you have access to, so you can look up a device without opening its project first. Both lists behave the same way:
- They are ordered by project, then device type, then name, so devices of the same kind stay together. The cross-project overview shows the project column by default.
- Which columns are visible can be chosen per list.
- A search bar finds a device by name, and a filter panel narrows the list further.
Filtering the list
Open the filters to narrow the list on:
| Filter | Use |
|---|---|
| Status | Active devices, or deleted ones. See below. |
| Type | Battery system, PV inverter, energy meter, EV charger, and so on. |
| Brand / model | A specific manufacturer or model. |
| Controllable | Whether the EMS can steer the device or only read it. |
| Nominal power | A minimum and a maximum, to find the large or the small assets. |
Clear filters returns to the full list.
Deleted devices and restoring one
Deleting a device does not erase its history. Set the Status filter to Deleted to see the devices that were removed from the project, with the date each was deleted.
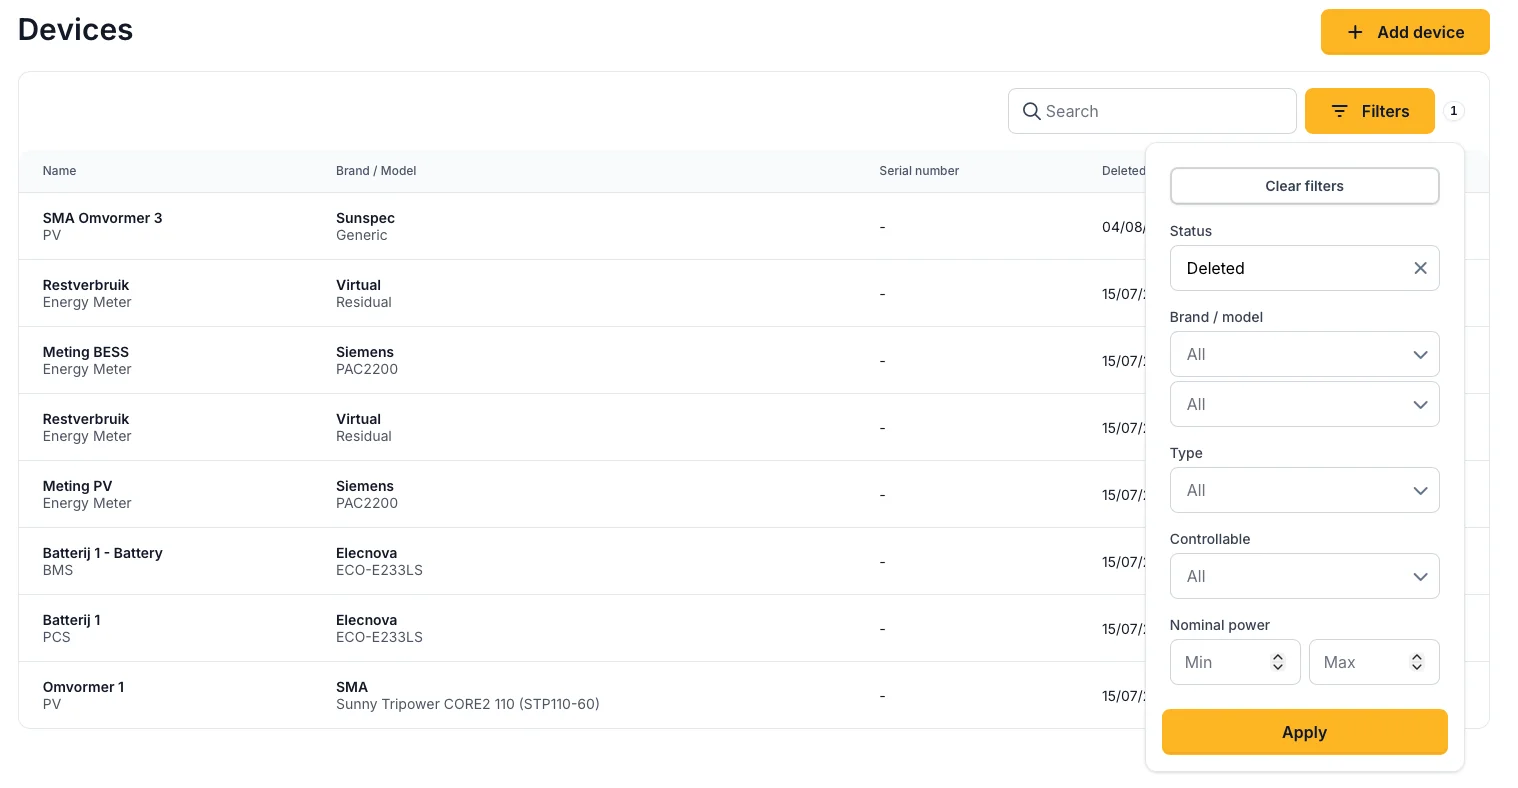
The device list with the filters open on the Deleted status.
A deleted device can be put back with Restore device. The restore brings back the device together with the references that were removed with it, for example the meter that was designated as the grid meter or the parent device a child hung under, so you do not have to reconstruct the configuration by hand.
Restoring is not always possible, and the list says why:
| Situation | What to do |
|---|---|
| The parent device no longer exists | Restore the parent device first, then this one. |
| Deleted before this feature existed | The removed references were not recorded at the time, so they cannot be put back. Add the device again through the wizard. |
Adding a device
Click Add devices to open the device wizard. You will be guided through selecting the device type, manufacturer and model, and configuring the communication settings.
To add a device, you must have the Installer role on this project.
While you are configuring the communication settings, the wizard helps you in two ways:
- The Modbus slave ID is prefilled with the value most commonly used by comparable devices. Change it when your device uses a different address.
- When the wizard probes the device, the EMS controller reports back what it finds, including the MAC address it reads off the network. The controller is asked for the address directly, so it is also filled in for devices that were already in the project, and it is refreshed whenever the connection settings of a device are saved. While the lookup is running the platform shows that it is checking; a device with no address of its own on the controller's network is reported as such rather than left blank.
Adding a PV inverter
- Click Add devices and select PV Inverter as the device type.
- Select the manufacturer and model.
- Configure the communication settings (IP address, port, slave ID) according to the inverter's network configuration.
- Complete the wizard and save.
For Growatt inverters: if the inverter communicates via Modbus TCP, a ShineMaster data logger is present, so add the device using the ShineMaster adapter. If the inverter uses RS485, use an RS485-to-TCP converter such as the EP E300 before adding it.
Adding a battery system
Battery systems typically consist of two components:
- First, add the battery inverter (PCS), the power conversion system.
- Then add the battery management system (BMS), which monitors and protects the battery cells.
Follow the wizard for the specific brand and model. Your installer can provide the exact communication parameters.
Adding an energy meter
- Click Add devices and select Energy meter.
- Select the manufacturer and model.
- Configure the communication settings.
- If the meter is a sub-meter, link it to the appropriate parent device.
To add a virtual meter, which is a calculated meter with no physical hardware, select Virtual as the manufacturer and follow the wizard. The measurement logic is configured based on your installation.
Adding an EV charger
- Click Add devices and select EV charging station.
- Select the model and configure the communication settings.
- After adding, configure the connectors and energy management settings for the station as described in the charger's documentation.
Supported devices
During the Add devices wizard, you can browse all supported manufacturers and models by device type. Supported devices are listed per category (PV inverter, battery, energy meter, EV charger, etc.).
Important configuration tips
Before finalising your EMS configuration, verify the following:
- The correct head meter is selected under project settings.
- The grid connection type (single-phase or three-phase) matches the actual installation.
- Import and export limits and the corresponding safety margins are set in line with your grid connection contract.
- The strategy (cost optimisation or self-supply) matches your energy contract type.
- All key meters and devices have the correct communication settings and are responding with live data.